The essence of photography or nostalgia from the past. Call it what you want, but black and white photography is an art on its own.
There is many way to transform your colored picture in black and white, in this tutorial, I will show you, in a very easy way, how to do it. Is it the best way to edit a photo in black and white? no, it's only one of the countless ways to do it.
Befunky which is a free online photo editor, has all the tools to allow you to do a stunning black and white photo without passing by hundreds of filter effects.
Edit and master Black and White photography.

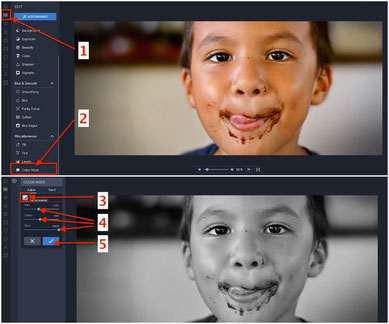
In this tutorial (screenshot on the side) you will be surprise how you can do so easily a stunning black and white with Befunky without special filter or special photo effect.
Although, with Befunky there is many ways to do a nice black and white, today I'll just show the basics of the black and white photography editing with the red, green and blue color sliders (sound strange using "color" for a black and white, no ?), because those are the very basics you need to use to master the black and white photography.
- Be sure you are in Edit mode.
- Scroll down to find the color mixer menu, then click on it.
- A new window tool appear, click on the black and white icon.
- Play with the three sliders (red, green and blue). Tips: push each slider to their both extreme sides to see what happen, and remember a good black and white should have enough black and enough white, it's not about being just all shade of grey.
- Once you are happy with the result, do not forget to apply the effect by clicking on this button.
Bonus: how to do selective color on a picture with Befunky.

I am not a huge fan of the selective color on a picture (called also a color splash on some photo editors), but it's actually a
kind of fashion among some photographers and, in some case, I should say it can be very nice when it's well made.
And now that you can master the Black and White with Befunky, let's just play and extend your knowledge with a selective coloring on a black and
white photo.
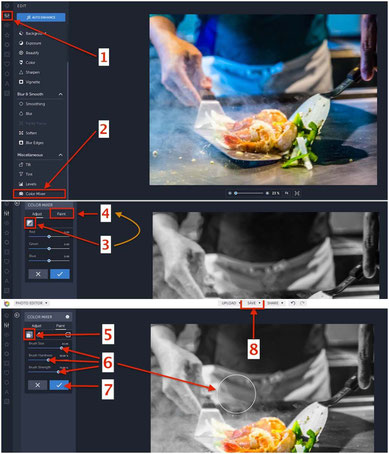
There is many ways to do a selective color, so in this tutorial, I'll show you one way to do a color splash on any kind of photo with Befunky.
But first at all you should know that doing a color splash(selective color) is to made the subject stand out, literally, and doing a selective color on a face only is bad at 99.99%, so consider to never do it on a face of someone, choose a picture where the subject is an object, not a human or animal and in focus (later with experience you will do people), also consider to choose the photo where everything can be erased from the picture but not the main subject, if your picture met all of these, it can be a good one for a selective color.
- Be sure that you are in the Edit mode.
- Scroll down then click or tap on the Color Mixer sub-menu.
- Click/Tap on the "Black and White" button, at this point you can adjust the 3 different sliders (Red, Green and Blue) to adjust the black and white you would want to become later when you will do the selective coloring.
- When you have finished to adjust the black and white, click/tap on the Paint button/tab. You are now in a "Brush" mode (just put the pointer over the picture a circle appear telling you that's a brush)
-
WARNING: From now 2 options:
- If you click on the Reverse button, your photo in color will show up and everywhere you will pass the brush will become black and white.
- If you do not click on Reverse button, everywhere you pass the brush will get back in color. - Do not forget to readjust the size of the brush depending the tiny part you want to be part or not of the color splash.
- Once it's finished, apply the effect.
- Save your master piece on your computer or share it online.
You might also be interested with some free photography eBooks:
If you like this page let me know it in a comment below (read the rules) and don't forget to share it now on your favorite social media.
Thank you for your support.


Write a comment
Alison (Thursday, 29 September 2016)
Thanks for the color splash tutorial, it seems very easy to do it (I thought it was a lot more complicated).
Paul (Sunday, 23 October 2016 23:45)
Nice tutorial, TYVM Patrice.